While playing around with autotest-style QUnit, I needed something to work on that actually needed some tests. Naturally, I settled on the same problem that they did in the video: Given a string with $-placeholders, replace the placeholders with values from a context object. Here's the code I came up with:
Dead simple, right? Four actual lines of code and a bunch of setup to put it in a fake module. Here are the tests:
$(function(){functionreplace(source,expected,context,msg){equals(template.render(source,context),expected,msg);}module("template.render");test("with no tokens",function(){replace("","",{},"returns blank string if the given string is blank");replace("hello, world","hello, world",{},"returns a non-blank string unchanged");});test("with one token",function(){replace("$name","",{},"replaces token with empty string if no value in context");replace("$name","Aaron",{name:"Aaron"},"replaces token with value from the context");replace("Hello $name!","Hello Aaron!",{name:"Aaron"},"leaves the rest of the string unchanged");});test("with two tokens",function(){replace("Hello $name! It is a $attitude day.","Hello Aaron! It is a wonderful day.",{name:"Aaron",attitude:"wonderful"},"replaces each token with the value from the context");replace("Hello $name! It is a $attitude day.","Hello Aaron! It is a day.",{name:"Aaron"},"replaces each token without a value in the context with the blank string");replace("$me$you","AaronJohn",{me:"Aaron",you:"John"},"replaces adjacent tokens with their respective values");});});
Kind of verbose, but they're actually kind of interesting. They're written in a BDD style, or as much of a BDD style as QUnit will allow. You can easily imagine a tool that extracts:
template.render
    with no tokens
        - returns blank string if the given string is blank
        - returns a non-blank string unchanged
... from tests like these. Indeed, such tools exists for RSpec and there is a BDD JavaScript testing framework, imaginatively named: JSpec, which I expect provides similar tools for it's tests.
It was an interesting experience to work my way through the tests one at a time, implementing that simplest thing that could possibly work. Though, It is kind of discouraging that the test suite is so much longer than the implementation, especially considering this code is so easily tested.
I was watching a video on performance code kata and I was intrigued by the use of autotest. Basically, it's just a tool that watches the filesystem for changes and re-runs your test-suite when stuff changes. I thought it was a neat idea and wanted to try it out, but I don't really write any Ruby. Instead I turned to the world's most popular dynamic language: JavaScript. I've used QUnit to do some test driven development in JavScript, so tried the simplest thing that could possibly work, a meta-refresh:
<metahttp-equiv="refresh"content="5"/>
... and that kind of worked. It was kind of cool, but the constant refreshing gets in the way of of using the JavaScript console to poke at things. Which, when you're writing JavaScript, is kind of an important thing to do. So... meta-refresh with a pause button?
There you go. Thirty-odd lines to implement meta-refresh a pause button sigh.
It is actually pretty neat. If I used QUnit more and was in a better position to judge the actually usefulness of such a feature I might try hacking this into core QUnit and seeing if I could get it merged upstream. I mean, there are entire projects built around adding this kind of functionality to other tools, and it's so easy to do in a browser. I'm not planning on it though, because I've only actually used QUnit for fun-zies, and can't really judge how useful this kind of functionality would be on an actual test suite.
May I Bring Your Attention To...
One of the cool things I ended up implementing was Chrome-style disable-enable behaviour for the pause/resume button. Basically, as part of the click handler, it disabled the button and attached a mousemove event handler on the body. The handler then enables the button and unbinds itself when a mousemove event fires. The cool part is that while the button is disabled and your cursor is over it, moving your mouse doesn't fire any mousemove events, but the second your cursor leaves the button, a mousemove event fires and the button gets enabled. You get to safely reuse the pause/resume button without worrying about double clicks doing the wrong thing. Pretty spiffy, huh?
In my post about Grayvatar, I warned everybody away from actually using it for anything as it was a complete toy. The major reason I cited was that it did not make any attempt to respect cache headers. Enter Grayvatar 2.0, which is slightly less of a toy as it, at least, makes a half-hearted attempt to respect cache headers.
The key addition was httplib2, which maintains it's own cache, so that we're not hitting Gravatar's servers for every single request we receive. The other big change was to copy cache headers from the client to the server and vice-versa. This means that we'll pass a long the cache-control:max-age=300 that we get from Gravatar or the cache-control:max-age=0 we get from the client. All of this adds about 20 lines on top of the existing implementation. You still shouldn't use it for anything, it's still a toy, but at least it's slightly less naive one.
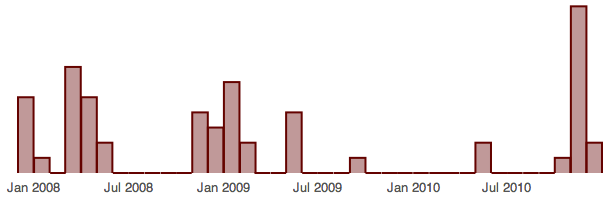
This nicely illustrates that my blogging attention span is kind of bursty. There is a cluster of posts during the first half of 2008, another one in the first half of 2009 and then a giant dead spot from the middle of 2009 until last month. It's actually kind of funny that pretty much all of my blog posts have been written in tree bursts of attention separated by big swaths of neglect.
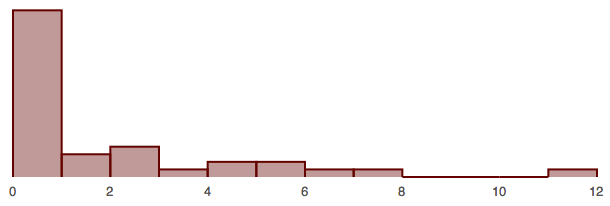
Histogram of Post Frequency
... and the runaway winner is zero! Mostly explained by the fact that there have been streches of five or six months where I haven't posted a single thing (like, for instance, the first half of 2010). November 2010 deserves special mention as it is a crazy outlier on the the complete other end of the scale with four more posts then then next most prolific month.
Making Tufte Proud
I used flot to generate the histograms and while it does a good job at producing nice looking graphs it has the annoying habit of adding lots of stuff to your plots which reduces the percentage of pixels in your plot that convey data (data ink). It took a surprising amount of fiddling to turn off all of the exta stuff, most of which was accomplished by setting the color of the grid lines and frame to white:
The week before last I got to spend some time working on a prototype as part of a sekrit project at work. In order to give the prototype the air of not-quite-done, I did the whole thing in black and white. This worked great up until I added in Identicons to identify users, which added a bunch of brightly colored triangles and ruined the whole black-and-white aesthetic. I eventually ended up pulling a bunch of Identicons from Gravatar with wget and desaturated them with ImageMagik. It worked, but it was kind of gross.
Teh Codez
It occurred to me that it should be pretty straightforward to build a web app that implemented the Gravatar API and desaturate real Gravatars, so I took a crack at it:
I think it's awesome that, thanks to CherrPy and PIL, I could put together a web app that does all that 30 odd lines (including imports), but it's less awesome that so many of those lines are shuffling data in and out of a StringIO.
The most important change was adding 'log.screen': True to the config. This sends errors to stderr, which eventually makes it's way to /var/log/apache2/error.log which makes it possible to figure out what's going on when things don't go right.
How It Works
Just like Gravatar. The base URL is http://aaron.maenpaa.ca/grayvatar/. You calculate the MD5 hash of your email address, append it to the base URL and then add any query parameters that Gravatar supports. That gets you a URL like this: http://aaron.maenpaa.ca/grayvatar/634329486bd326c395c8b3539c035139?s=256&d=identicon&r=PG
It fetchs the appropriate Gravatar, desaturates and returns it. Keep in mind, this is a toy: It doesn't actually respect the cache headers Gravatar sends and worse, it doesn't even pass them along to the client.